
By now you know we are Pandora and Xena. You might recognize that we're at the loft of my Palace. Either you have built the base of a Palace for your guinea pigs and are about to build their loft, or you plan to build an entire Palace in one project. Even when it is all built in one project, we recommend that you put the base together first so you can double check measurements before building your loft.
Click here to see our suggestions for building the base.
Reminders: Although we live in England now and our Palace was built here, we did not start out here. Some of the materials used to build our Palace came from the United States. If you do not live in the States, you may have to find local substitutes for some of those materials. Please bear in mind that our Palace does not have a roof. It is only suitable for indoor use where there are no predators such as dogs or cats to threaten your guinea pigs.
Design Decisions Before Making the Loft

You may want to make your loft and landing with dimensions different from ours, with special consideration for litterboxes.
Think about that now, before cutting any pieces for the loft and landing.
We sometimes show how a commercial litterbox fits under our loft, but Xena and I don't use commercial ones very much. We prefer drawer organizers. You can see our four favorite types in this picture.
At the beginning of the original home tour about our Palace, you can see Pandora sitting in one that fits perfectly on our landing. Most of our drawer organizer litterboxes are an inexpensive type that is made so one long edge has overhanging tabs (lips) that can fit over the edge of an adjacent organizer, holding two units together. A long side of the litterbox on our landing latches onto a short side of a longer litterbox at right angles to it. Having adjacent litterboxes latched onto each other protects us against getting a foot stuck between them, which might hurt us. We can easily and safely enter our loft by way of litterboxes if we wish, or we can lounge in those litterboxes and guard the ramp together.
Your landing might not be the same size as ours.
We highly recommend making your landing the right size to hold a litterbox similar to ours, but you might want a long one instead of the short one we chose. Our instructions give dimensions for a landing that will hold a long one.
The landing is our favorite lounging spot in the entire Palace. A piggy in the landing has the power to decide who can pass by. The litterbox there generally needs changing once a day–twice as often as the next most popular litterbox. Imagine how often you will have to clean the landing if you can't put a litterbox in it!
To put a litterbox there, you must decide what you will use for litterboxes and take measurements. As you can see in the photo, even litterboxes that are sold as being about the same size will not necessarily fit in the same space. Our landing holds the smallest litterbox shown. Our landing cannot hold the other 6" x 9" box shown in our photo of drawer organizer litterboxes–the other style of small box has thicker sides at a slight outward angle and needs more space.
You must also decide whether to make a one-piggy landing like ours, or a two-piggy landing with a longer litterbox to reduce contention between your piggies. Xena and I love each other a lot and mostly regard control of the landing as a game of Collecting The Toll. If your piggies don't get along as easily as we do, a two-piggy landing and litterbox will be a better choice. That's why we gave dimensions for a two-piggy litterbox at the landing.
You may want to make your landing and ramp detachable from your loft.
We did. In actual use, we only detached the landing and ramp assembly once, to make the loft a little easier to move from one human house to another–and detaching it wasn't really necessary.
Making the unit detachable is significantly more complicated and bothersome than making the whole loft, landing and ramp a single unit. We will tell you how to make your landing and ramp permanently attached to the loft because it is so much simpler to build that way. If you want to make yours detachable and need advice about how to do it, let us know.
You can make the ceiling of the ramp detachable or hinged for easier access, latched most of the time to keep your piggies from knocking it open.
Our humans are tall and have long arms. They can reach the entire landing and ramp for cleaning. If they were shorter, they would have trouble cleaning the entire floor of the ramp. We would need to allow them to lift the ramp cover in order to clean properly.
Even our tall humans need to be able to remove the ceiling on our landing to clean it properly. We have a thin plastic ceiling for the landing, which slides into metal brackets. We don't tussle much on the landing and don't try to push through the ceiling, even though we could easily dislodge it. If your piggies might push through, fall out and hurt themselves, give the landing a more robust ceiling–perhaps a hinged wooden lid with a latch.
Similarly, if your piggies might climb out at the V shaped opening where the ramp meets the landing, extend the ramp ceiling and mount a protective barrier on the outer edge of the ramp or landing to keep your piggies from falling out. (You may need a small spacer so the protective barrier will not snag or rub as the ramp is raised or lowered.)
Cutting Pieces for the Loft and Landing

The loft is more complex than the base.
- Its glass walls are slightly taller so we can comfortably pass under the support rail without ducking.
- It needs to be able to rest on support rods between support towers, or sit on the floor when it is used on its own as a temporary cottage home.
- It must not be heavier than the support towers can safely handle. (Bear in mind that our weight and the weight of our furnishings will be in it, too.
- Its vinyl flooring is not quite rectangular because it needs to extend into and past the doorway to the landing.
- Our instructions are for a permanently attached landing and ramp. That assembly can be made separately, able to join with and let go of the loft. Our instructions are not explaining how we did that, so contact us if you want to do it.
- To get as much floor space as we want in the loft (and a convenient fit for our favorite litterboxes and hideys), grid squares for the short sides need a slight extension on each side so they will meet the grid squares on the long sides.
These are the pieces of wood and glass you need to cut for the loft and landing of the Palace. If your wood comes in different dimensions, you'll need to adjust the lengths of pieces appropriately. You will also need to make adjustments for your design decisions such as the specific type of litterbox you want to use in the loft. You might want a longer ramp if your loft will be higher than ours. The floor of our loft is 12" above the base.
Loft Construction, Part 1

Throughout construction, plan the locations of your screws near the corners so screws don't run into each other. Make sure none of the screws attaching anything to the underside of the loft or landing protrude above the level of the floor.
The posts E belong at three corners of floor A and where there would be a corner if the landing were not present, with their notches facing inward. The side piece B1 and two pieces C go on the sides between the posts. Piece B2 goes from a post almost to where the landing juts out, where it meets upright piece D standing like a post at the inward edge of where the landing begins. This is a lot like the early part of Base Construction, Part 1, but the loft has to incorporate some extras.
Place the pieces on floor A first to make sure everything fits correctly. Especially make sure the notches in the posts do not allow some of the posts to intrude into the floor space more than the side pieces. Do not attach any pieces yet.
Attach three pieces (type C) to the underside so you will be able to put the loft on the floor despite the pipe holders and such underneath it.
Turn over floor A so its underside faces up. Position one piece C with a 3/4" side across the width of the loft, centered (29" from each end of the floor A) and with its ends 1 1/4" in from each side of the floor. (The piece will stick out 1 1/4" under floor A when it is attached.) Mark the positions for screws to hold it in that position (at least one near each end, and one or two in the middle of the span). Drill pilot holes for the screws through floor A and into the piece C.
Do the same for two other pieces C, positioned so their outside long edges are 3/4" from the short edge of floor A and one end is 1 1/4" from the long edge of floor A.
Attach all three of those crosspieces C.
Attach the pieces that will go along edges of the topside of the floor.
On floor A, mark screw positions for attaching the posts D and E, side pieces B1 and >B2, and remaining pieces C. Drill pilot holes. Among these, there should be screws on the long sides 1" from each end, in the center of each long side, and at the midpoint between the center screw and the screw near the end. These are special attachment points.
Attach pieces B1, B2 and two pieces C to floor A so they are on the opposite side (the top) from the side that has crosspieces (the bottom). At each special attachment point, drive the screw through a pipe mount on the underside and align the pipe mount so a pipe will run under the long side of the loft. Aside from the special attachment points, attach the pieces by driving 1" screws through floor A into the pieces, and driving 1 3/4" screws through the posts into the side pieces.
Similarly, attach pieces D, H, I, and J to the landing as shown. At this point, you should have posts and wooden base pieces around all of the loft floor except the opening to the landing, and around all of the landing floor except where it leads to the loft and the ramp. You should also have pipe mounts underneath, and you should be able to put the loft on your workspace floor without damaging the pipe mounts.
This may have seemed like a bother compared with the base. The crosspieces underneath the loft allow you to put it down on the floor without damaging the pipe mounts. We found this handy not only during construction, but at any time when we need to separate the loft from the base and use it separately in another location.
Attach supports for the landing.
Turn the loft upside down.
The landing sticks out, and you will find a piggy lounging in it much of the time. It needs extra support. Position the two landing supports K as shown and attach them to the underside. Positioning need not be very precise. You just need to put these two pieces where they will keep the landing from sagging. Make sure they are not so thick that they will interfere with the pipe that has to support the loft! After determining the positions, you may need to drill pilot holes and turn the loft over so you can put in support screws from the top.
Attach the ramp support slot.
Start this task with the loft upside down.
When you raise the ramp, you will need to slide out the metal support bar to hold it up. Position the two pieces M as shown and piece N over them to form a slot for the metal bar. Experiment to see whether you need to add spacers so the bar can slide in and out easily. (We did, and used some washers around our attachment screws.) When you are satisfied with the fit, attach the wooden pieces for the pocket that will hold the steel bar. (Our loft has a corresponding pocket on the underside of the ramp, but we found that is not necessary.) Attach the pieces M and N to the underside of the loft. The slot assembly should be adjacent to the central piece C that you attached earlier, on the opposite side from the landing. Make sure the slot assembly is set back from the side of the loft by enough so it will not interfere with the pipe support you will run under the edge.
After determining positions for bar support pieces, you may need to drill pilot holes and turn the loft over so you can put in support screws from the top.
You are finished attaching pieces underneath. Turn the loft rightside up before going to the next step.
Loft Construction, Part 2

Place the pieces F (short sides) and G (long sides) on top of the loft posts first to make sure everything fits correctly. Make sure the notches in the posts do not allow some of the posts to intrude into the floor space more than the side pieces F and G. Then attach the pieces F and G by driving screws as shown. You will need 1" screws to hold the mitered ends of pieces F and G together, and 1 3/4" screws down through the tops of pieces F and G into the posts.
Attach landing crosspieces I and J between the landing uprights along the three outside edges of the landing between the tops of the landing uprights.
Remember to plan the locations of your screws so screws don't run into each other.
Drill holes through the two 16 1/2" long pieces of C channel and the two 55" long pieces of C channel for the very small screws that will hold those pieces in place. For each piece of C channel, you will need a hole near each end and at the center. For the long pieces, also drill holes midway between the center hole and each end hole. Attach each piece of C channel centered on an appropriate top rail F or G.
Position the hinges that will attach the ramp to the underside of the landing. Attach one side of each hinge, taking care to put the heads of the bolts on the top. Try to sink them into the wood so they don't bulge above the landing floor. Use metal washers if necessary so you can put the nuts underneath the landing where the hinges are.
Loft Construction, Part 3
It's best not to get the glass (or plastic) side panels H and I until now. Measure, measure, measure! Remember to allow for the thickness of the side panels, and subtract a small fraction of an inch from the length you measure just in case. (We subtracted 1/8".) Set the glass aside–you aren't quite ready to install it yet.
If you want to paint the external portions of the frame, it is easier to do that before side panels are in place than it will be after you finish the base. Remember that none of the paint should be accessible to your piggies. It needs to be outside the glass and outside the line defined by the outermost edges of the C channel.
Install Vinyl Flooring
Fitting the flooring will take a little more effort than for the base because it is not a simple rectangle and must extend to cover the floor of the landing. Make sure you have the flooring cut to exactly the right shape and size before laying it down on adhesive.
Apply flooring adhesive or general purpose construction adhesive on the floor of the loft and landing. Use a notched trowel to spread it evenly. Install vinyl flooring and smooth it down flat. Wait until the adhesive has set.
Install Side Panels
Put your side panels in place to make sure they fit and leave no sharp edges exposed along their top edges that could hurt your piggies. Then remove the panels again. Using wire cutters, snip off the curled ends off the cable clips that are going to hold the top edges of your side panels.
Apply general purpose adhesive to the inner portion of the wood frame for the bottom and sides of each panel opening, and only the 1/4" of the frame above each panel opening. Put the panels in place again and carefully press their edges to the glue. Gently nail the cable clips in place to hold the tops of the side panels. Wait until the adhesive holding your side panels has set.

Cut 90 degree plastic corner guard to fit the junction between your side panels and flooring, as shown. The piece of vertical corner protector where side panels meet is optional. If you have a good clean fit, the vertical piece is purely an aesthetic choice.
Use clear silicon caulk to put the corner guard pieces in place, taking care to make a leakproof seal all the way around.
Because of the posts providing structural rigidity where the loft extends into the landing, you cannot fit a single glass panel across that short side of the loft and landing. You have two glass panels there, with a small amount of exposed wood. You also have a little exposed wood on the other side of the opening into the landing. You cannot readily coat this with waterproofing, paint it, slather it with silicon, or glue plastic to it because your piggies might chew there and be hurt by your method of sealing.
Most of that wood is covered by metal angle pieces in our Palace as a method for joining the landing and loft. If your piggies use Superjet Pee Blast on each other a lot, leaving the wood exposed could be a problem, since they will miss occasionally and wet the wood. If you need to cover it, we suggest screwing fitted metal over the exposed posts and caulking the gaps between the metal and the glass. (That area is subject to stress, so glass mounted there could shatter, but metal will resist the stress as well as fend off your piggies' teeth.)
Make an Access Panel

Use tape or thin felt to provide just enough of a spacer between two metal grid squares to keep them from rubbing against each other and squeaking. Use tape (electrical tape works fine) and/or cable ties to firmly fasten the two grid squares together . Fit one edge of the two-square panel into the three foot long piece of C channel, centered. Use tape and/or cable ties to fasten the grid squares into the C channel.
This is your access panel for the loft. Notice it is a fraction of an inch narrower than the access panel for the base.
Install Metal Grid Squares
Grid panels need to fit more closely together for the loft, with only enough spacers to prevent rubbing and squeaking. Tape or thin felt provide enough spacing between grid panels.
Place metal grid squares in the C channel and attach the tops using cable ties–except omit the two grid squares for the center of the long side you want to use to access the loft of the Palace. Put your loft access panel there, with the C channel at the top of the access panel fitted over the tops of the grids at each end of the long side.
Put a Roof on the Landing

We haven't been explicit about how to put a removable roof on the landing. How to do it is a matter of personal preference and depends partly on how boisterous the residents will be. We aren't inclined to pop off our roof and try to leap out, so ours is flimsy–thin plastic that slides under four metal clips. Something more sturdy is advisable with piggies who might try to jump out.
Loft Ready for Use
The loft of your Palace is now finished. You need to finish the landing and ramp, build supports, perhaps change out the metal grid squares on one long side of the base, and put it all in place before your piggies can use the loft in conjunction with the base.
You can line the loft with a beach towel. Our beach towel is folded lengthwise for a perfect fit, and it is so comfy that we do not bother with a fleece topper in the loft.
Cutting Pieces for the Ramp

Several of these pieces are shown with approximate measurements, and you will also need a strip of vinyl flooring (which you probably have left over from building the loft).
After you attach the B and D pieces to the ramp floor, you will need to lay some of the pieces out to mark angles on them and cut them to suit. In essence, you're going to build enough of a frame around the ramp to give piggies a sense of security and keep them from falling off, but it won't be a tunnel. Although a tunnel is easier to build, it is not as airy. Also, if anybody gets in trouble on the ramp, the humans can reach them better through this framework.
Ramp Construction, Step 4
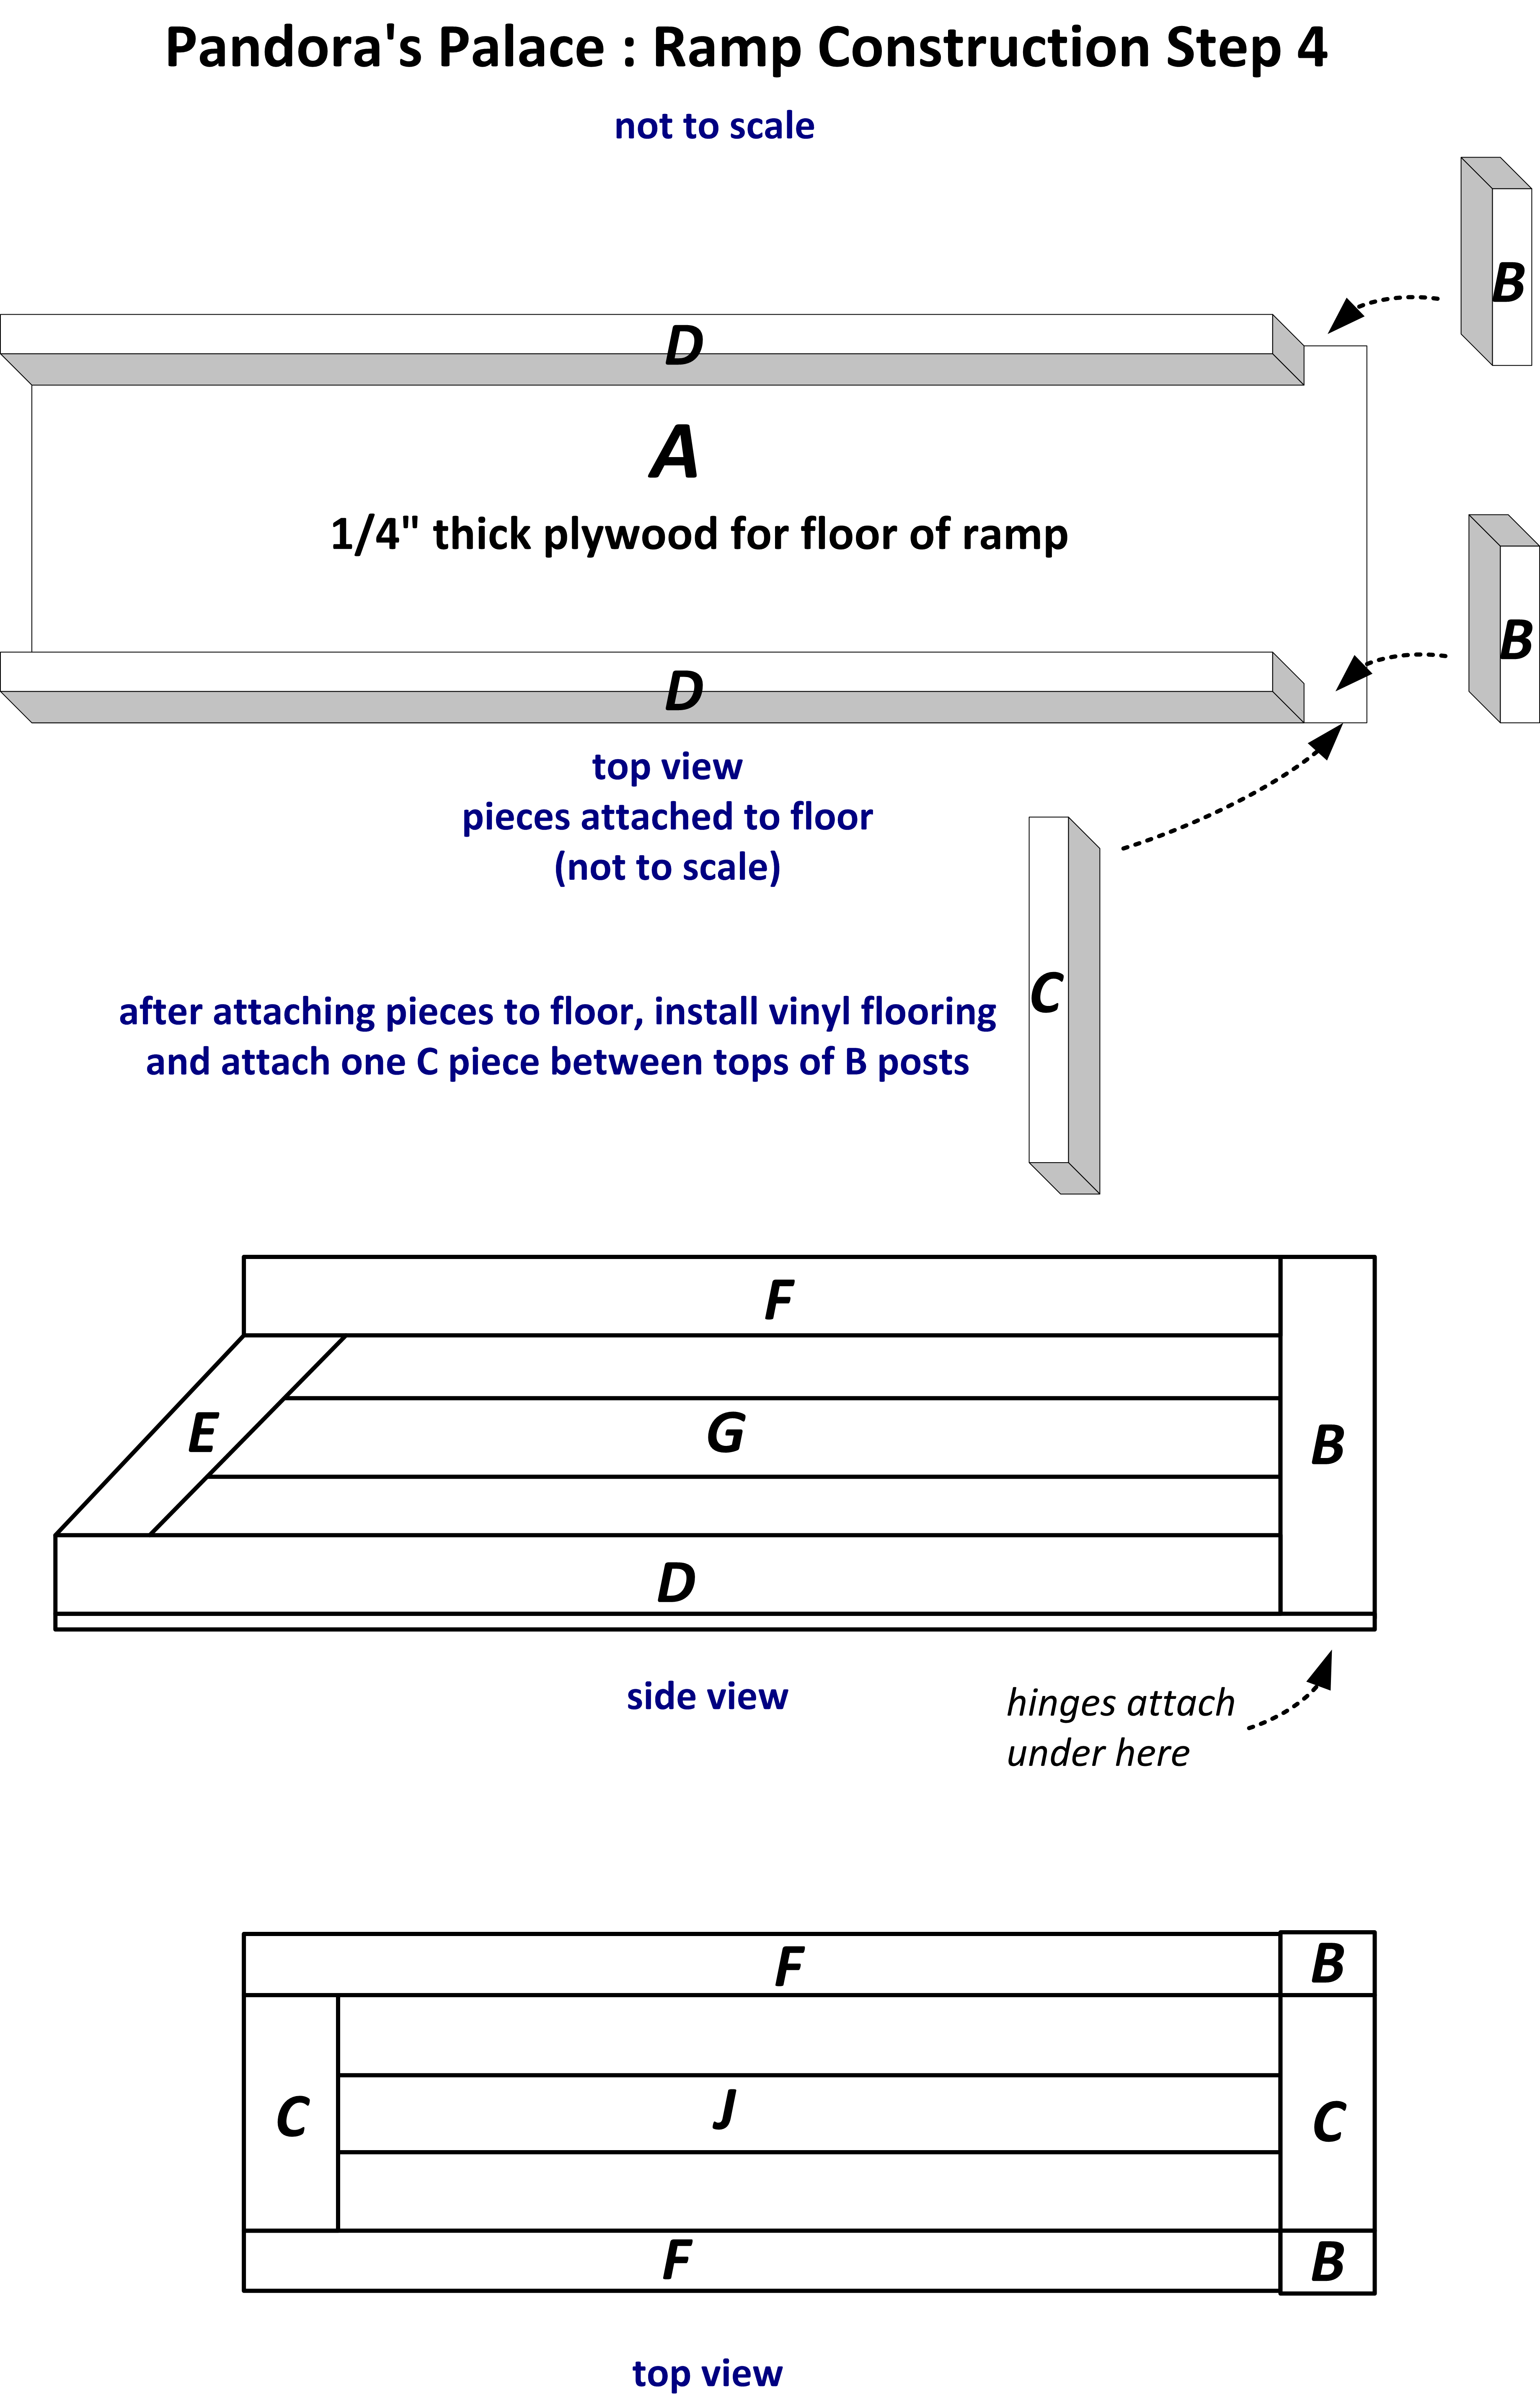
Attach B posts and D pieces along the long sides of the ramp floor.
Attach one C piece as a crosspiece between the tops of the B posts.
Mark where you will need bolts for the hinges and drill holes for the bolts. The heads of the bolts will need to sink into the wood enough so they do not protrude. Check that now.
Install vinyl flooring on the floor of the ramp, but do not glue down the last few inches at the top of the ramp so you can peel it back to attach the hinges. When you cut the vinyl flooring, leave about two inches extra at the end that will be farthest from the landing. Wrap the vinyl flooring around the end and glue it firmly to the underside of the ramp. If any of your piggies pee near the bottom of the ramp, this will keep it from wicking into the wood and making your ramp smelly. We didn't bother with plastic corner pieces where our vinyl flooring meets the ramp frame. We just put a bead of clear silicon caulk there.
Next, lay the ramp on its side. Position one of the F pieces with one end against a B post. Make sure it extends parallel to the D piece that is lying on your worktable. Position a E piece so you can mark the angled cuts it needs on each end. Look at the side view to see what we mean. Cut both E pieces exactly the same. Screw the E and F pieces into place.
Lay the ramp on its side again. Position a G piece as shown in the side view, midway between the D and F pieces, and mark the angle cut it needs at one end. Cut both G pieces exactly the same and screw them into place. They are not as thick as other frame pieces. Align them so their outside wide edge is flush with the outside of the rest of the frame. This gives your piggies a little more space for their haunches as they traverse the ramp.
Attach the remaining C piece as a crosspiece between the tops of the F pieces at the end that will be farthest from the landing.
One side of the hinges is already attached to the landing. Attach the other side to the ramp, then glue down the loose upper few inches of the vinyl flooring.
Attach the J piece as the middle of the top of the ramp frame. The ramp is finished!
Supporting and Setting Up the Loft
Loft Support Stands
Exactly how you make support stands for your loft depends upon what you have available, how high your loft must be, and how you want to locate your loft relative to the palace base. We used bookends, wood and angle iron to make ours.
Although the weight-bearing portions of our loft support stands are made of angle iron, for stability we use two pairs of metal bookends and some wood to keep them the right space apart. The foot of a bookend underneath the base of our palace keeps a support stand upright and prevents it from moving out of place. Long pipes through the pipe supports under the loft rest on angle iron in notches with a little felt in them to prevent squeaking.
It's okay to come up with a design of your own to suit the loft position you have in mind.


Our loft is 12 inches above the floor of our base, and it overhangs enough for us to put an American mailbox hidey between the ramp and the wall of our base.
Positioning like ours has a couple of implications. We have to replace the metal grids on one long side of the base with something else to fill the gap. We use gutter screening–mesh panels designed to fit at the top of gutters around the roof of a human house. They are just the right width to replace the metal grids under our loft.

Ramp Pad
Piggy paws can't get traction on a smooth ramp. We used to have a bare wooden ramp with tiny slats across it for traction, but that wasn't easy for us. If anybody peed, it soaked right into the wood. A ramp made closely spaced metal bars would hurt our feet.
The vinyl flooring protects your ramp against pee, but we need traction to use it. We need a cloth pad on the ramp. It should extend from the landing to about 4 inches above the bottom of the ramp.
You can use a folded hand towel for this. The weight of the litterbox in the landing will hold it in place, especially if there are small rubber feet on the underside of the litterbox. We went a step farther and sewed synthetic fleece ramp pads to fit. We put a channel in them so we could put a rod through them at the V-shape between the ramp and the landing, but we found the channel unnecessary. If your piggies are heavier than we are (about 1 kilogram, or 2.2 pounds), you might need a custom ramp pad with a channel for a rod to keep the ramp pad from slipping.
Leave a Reply